Wednesday, December 29, 2010

Scenery @ Proviso / Clinton

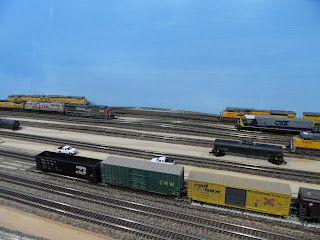
As I continue to apply basic scenery to the layout, the next section is the Proviso / Clinton Yard area.  Its a big chunk of real estate, but with the large amount of track and area set aside for warehouses and other industrial buildings/roads, there is not that much scenery involved.  First step was to attach aluminum screening. 

I got a new small staple gun for Christmas that made the work so much easier than my old 25 year old generic model.  Should have gotten it before I started on the scenery.  Oh well, water under the bridge. 


Next, is the messy step of model railroad building and probably my least favorite; plastering.  I mix up the plaster of paris and apply it to the screening with a butter knife.  I know there are lots of newer methods out there, but this is the one I know. 


Finally, painting and application of ground foam.  Also a bit messy, but doesn't bother me as much since its closer to the finished product.  Before I began, I first covered up the track with masking tape.  A step that I also did before plastering, although for that I just taped the track next tot the plaster.  Here it all gets covered up.


After getting a second gallon of paint, I got to work and completed yet another section of basic scenery. I now have just one more section left to do.  I hope to get that completed before the end of Christmas break next Tuesday.


Saturday, December 18, 2010

Open House for St. Paul School Children

The UPRR Geneva Subdivision conducted an open house for children of St. Paul Lutheran School of Rochelle, IL where I am Principal and my wife is Kindergarten teacher. It was a lot of fun to see the children excitedly watching the trains. We had a few mishaps, but for the most part everything went very well. There were a few derailments due to children getting a little too close with their fingers as they counted the cars. Also had one head on collision due to someone pushing a button which crossed a train from one mainline to the other. No one would admit that they were the one that pushed the button. :) Nothing hit the floor during the open house so I am happy about that. Fifty three people visited over 2.5 hours and I think everyone had a good time. I know I did. The first picture below show the most popular part of the layout for the kids. Its also where we had the most mishaps. I think they liked that they could get close to the trains and plus,it was pretty cool to have the trains come out of the stairs.


Sunday, December 12, 2010

Signals Knocking Down to Red at the Mississippi River

So this is what they mean when they say the signal is knocked down to red.  These are my first three light head signals.  All the others to this point are searchlight.  Very cool if I must say so myself!

Friday, December 10, 2010

Time to get a Humidifier

I had problems last winter with dry conditions drying out and shrinking the wood.  I really thought I would not have more of the same problems this year.  But, as you can see below, the wood is still shrinking from drying out.  My wife has been bugging me for years to install a whole house humidifier.  I think maybe its time I listen to her.

Sunday, December 5, 2010

Mississippi River Bridge Abutments & Scenery

Worked on the Mississippi River area this weekend for two reasons. One, it was the next area on the agenda and two, I just received some really nice signals from Scale Models Division and really wanted to get them installed. I already had the aluminum screening installed so Saturday morning I got things ready for plastering. As this is a bridge area I first needed to get the bridge abutment installed. I checked the photos I had of the prototype as a guide.
 East Bank
 West bank

For the abutments I used pieces of Masonite that I attached to the roadbed using finishing nails.I drilled holes for the nails to aid in exact placement of the Masonite and make them easier to nail.

East bank:


West bank:

I then got to plastering


That was it for Saturday as I needed to let the plaster set up for 24 hours before painting.  Today after church I painted the scenery, added ground foam, and  painted the track. 


Lastly, I added the rock work to the east bank and installed the signals.  The rock work is from Choch and is a flexible rubber sheet that is cut to size and applied.  It even has a peel and stick back that makes it very easy to install.  Great product.  I will be using it for all the bridge piers as well.


The signals were custom made by Scale Models Division to match the prototype below.  They look great and will really be awesome guarding the rotating bridge whenever I get that built.  I have not yet hooked them up to the signaling system but hope to take car of that this week sometime.  Here's a prototype photo from the Clinton side looking east and a satellite view of the entire crossing with the bridges being modeled circled in red.


Sunday, November 28, 2010

Video Fun on the Geneva

Still playing with my camera. I think I will keep it. Here's a few more clips.


Thursday, November 25, 2010

Happy Thanksgiving Video!

I was taking some picture with my new camera for an article I am working on when I decided to take a break from picture taking a catch a quick video.  Here are Kato Union Pacific SD70s and AC4400 pulling trains slowly across the Rock River.
N Scale Model Railroading is Fun!!!


Monday, November 22, 2010

More Technical Problems During

After getting the power problems of October 17 solved, I was looking forward to a problem free operating session yesterday. However… a problem free session was not to be! We did have full power for the entire session and we actually did very well in getting trains running and completed. There were problems however with a few throttles and getting turnouts to throw consistently. Additionally, signals were pretty much non operational. There was also some issues with the ability of the dispatcher, but that a topic for another time.


I was able to do some trouble shooting yesterday evening and I was able to recreate the problems we were having. I have six UT-1 Digitrax throttles. When four are plugged into the loconet there are no issues. Once I plug in a fifth throttle, one of the throttles goes flaky and the signals fail to operate. Just one of the throttles goes flaky, the other continue to work fine. Anyway, the Digitrax UP-5 Loconet Panels have provisions for a separate power supply. I connected a 12 volt power supply to one of the panels that two of the throttles were plugged into and the problems went away. Plugging a power supply into one of the panels only helps that panel. In order to get the additional power to the other panels I need to run a 22 AWG wire from panel to panel. So, that’s what I’ll being doing between now and our next operating session.

Thursday, November 18, 2010

HD Comes to the UPRR Geneva Sub

I've been testing out an HD camera on the UPRR Geneva Subdivision.  I will be making a decision on whether to keep it soon.  Its a refurbished Samsung HZ30W.


Sunday, November 14, 2010

Static Grass vs. No Static Grass

You decide!  Static grass or no static grass.  Right now I am undecided.

I finally got around to experimenting with some static grass, thanks to Bill Pistello and the use of his static grass applicator.  My first attempt, the lighter green grass in  the third photo, had a couple of misteps on my part.  One I used glue straight out of the bottle which was way to thick.  The grass did not stand up too well and the glue is partially visible even when dry.  Also, the green was too light and contrasts too much with the existing terrain.  I added some foliage to the grass especially around the edges to lessen the contrast.  This helped a little, but still needs some work in my opinion.  The second attempt I used 50-50 glue and water which work quite well.  I also used a darker green which blended into the existing scenery better.

I am not sure how much the grass improves the scene. I'm thinking as I get better at the technique, the improvement will increase.   Your feedback and suggestions is appreciated.


Wednesday, November 3, 2010

Handrails and a Hole in the Wall

   I made the mistake of using Floquil enamal paint for painting handrails safety white on most of my Kato engines.  The paint looked great, but does not adhere well to the plastic used for the handrails by Kato.  So, after years of use, many of the handrails had paint that was flaking off.  The flaking finally got bad enough that I spent some time the last couple of days addressing the issue.  I got some Badger Modelflex reefer white paint and added a bit of black and yellow to tone down the brightness of the white.  Modelflex paint is acrylic based paint that is designed to adhere better to the plastic and flex with the handrail instead of flake.  One by one, I took each of the affected engines (24 of them) and used an Xacto knife to gently flake off any remaining floquil paint.  I then repainted the handrails with the Modelflex paint.  Took awhile, but I think the effort was worth it.

   I also used a picture of the old coaling tower in Nelson to hide the hole in the wall that allows the mainline to pass from thee furnace room, containing Nelson and the east staging yard,  to the Rock River crossing and Franklin Grove. 

   The pictures below show an example of newly painted handrails, the coaling tower and the prototype photo of the coaling tower in Nelson.


Sunday, October 31, 2010

Triple Signals at Rochelle Diamonds

One significant feature of the Rochelle diamonds, in additional to the diamonds themselves, is the triple signal bridge for eastbound UP traffic across the diamonds.  Reinstalling the signal bridge from the old Rochelle Sub was a disaster as I burned out three of the six signal lights by hooking them up incorrectly.  In addition to that fiasco, I also did not like the double track bridge from the old layout since the prototype bridge spans three tracks; the 2 UP mainlines and the interchange track lead.  Since this layout includes the interchange track lead, the old signal bridge just did not look right unless it spanned all three tracks.   So, I had SMD build brand new triple signals to match the prototype and put them on a new three track bridge must closer to the prototype.  Below are pictures.  Once again SMD did an excellent job with the signals, although I was not able to use the platform SMD included with the signals as they were not compatible with the NJI signal bridge.  I did use the railings from the platform however.  Overall I think its turning our real well. I'm including a prototype picture for comparison.


Monday, October 25, 2010

Power Problems Solved!

Well, after a lot of research on the Internet, a lot of testing on the layout and great input from blog followers, the power problems have been solved.  After some experimenting on the layout, I found that the system was cutting out when the number of locomotives running on the layout was at 15 or 16.  When this limit was reached, the system would stop functioning, the PM4 power managers would trip in a very random fashion and the DCS100 command station would make continuous clicks.  The DCS100 manual indicates that continuous clicks mean low voltage.  For a while I thought it was too many throttles on the loconet or too much/incorrect loconet wiring or a bad CMOS battery or too many idle engines in staging, etc.  I eventually come to the conclusion that the layout was just too much for one booster and that the solution was a second booster.  So, I ordered a new power supply and bid $100.01 on a DB150 5A booster on ebay.   The power supply came in the mail today and the ebay auction ended @ 3:55 p.m.  The auction was @ $75 all weekend, so I was pretty confident the 100.01 bid via a sniping program at the last second would be successful.  Turns out two other bidders had sniping programs running and I lost the bid @ $102.05.  I was dissappointed, but figured there would be other auctions.  While I had the new power supply, I thought I would give it a try to see if the problem might be the Digitrax PS515 power supply.  So I swapped them out and started to run trains.  Much to my surprise, the system did not cut out with 18 locos running on the mainline.  Not being able to put anymore trains on the layout, I put a phone books on each end of the engine facilities and began running locos into the phone books and letting their wheels slip.  I got up to a total of 29 locos running on the layout without any problems.  When I started up one more consist, locos 30&31, the DCS100 circuit breaker tripped and all trains comae to a stop.  When I turned to power to 30&31 off, the system  powered back up and trains were running again.  So, I must conclude that the problem has been a faulty PS515.  I'm not sure if it came that way and I am only finding out about it now with a full operating session on the new, bigger layout or if it has gone bad lately due to age.  I've only had it for less than two years. 

   So, I am glad the issue has been resolved for now.  The number of locos running at one time should not ever exceed 20 so I think I am fine with just the one booster.  I am very glad now that I did not win the auction.  I saved myself $100!  Maybe I should buy a new engine to celebrate!
   I'd like to close with a few words about the new power supply I ordered.  I did not like the idea of spending $40-$50 on a new PS515 for the second booster so I looked real hard for an alternative at Mouser and Digikeys.  The cheapest I could find was $26 which ws still too expensive in my view.  Then I got to thinking that my Dell laptop battery charger puts out 3A, there must be a charger out there that puts out 5A or more.  So, I went to ebay and the > Buy > Computers & Networking > Computer Accessories > Laptop Adapters & Chargers category and searched for 15V 5A.  The search yeilded 143 results most of which were for chargers for a Toshiba laptop.  Most were between $10 and $15 including shipping.  So I picked one that was actually 15V and 6A for $12.99.  When I opened the package, I was not too confident in its ability to put out the power as it was much lighter than the Digitrax PS515.  But it works like a champ powering 29 locos, plus loconet, etc.   Time will tell how it does over the long haul.

Here's a link to the item charger  and a picture.

Friday, October 22, 2010

Power Problems During Op Session

   The UPRR Geneva Sub hosted an operating session last Sunday afternoon.  I was looking forward to the session because it was going to be the first op session with signalling and a full dispatcher.  We had ten operators in attendence and the session was going real well.  I was dispatching, a couple of guys were working the Proviso/CLinton Yard, an operator was attending to Global III and everyone else was taking turns being road crews.  Trains were moving pretty efficiently and everyone was keeping busy for the most part.  It turns out however, that things were going a little too well.  With so many operators, there were at times up to four trains runing on the mainline along with two sets of yard switchers working Proviso Yard as well as the Global II sitcher and the BNSF local crew.  The Digitrax DCC system began to shut down under the strain.  At first we thought that there was a short problem somewhere on the layout.  However, nothing was ever found and and the shut downs were becoming more frequent as the session progressed.  Every time the system shut down, the PM4s went crazy with all 8 power districts tripping in a rythmically random fashion.  To get things going again, the system had to be shut off and restarted.  We got about 3 hours into the session and were to the point of just 4 or 5 trains left to complete the days work when the shut downs were to the point where I gave up and we ended the session.
   Throughout this week, I have been thinking about what may have caused the problems.  For a while I thought maybe the battery in the command station was dead. But, even though its been five years since its been replaced, it did not make sense that a bad CMOS battery would cause shut downs like that.  Especially since the layout works fine when I operate alone.  In thinking about the problem, I keep coming back to the fact that the layout works fine when its just me, but shut down when 10 of us were operating.  The difference has to do with load of all those engines running at the same time.  I sat down and figured that the shuts downs were occuring when we had around 15 locos running at the same time.  With a five amp system, that means that each loco had to draw 1/3 amp each in order to strain the system.  Looking at Kato reviews on MR, I saw that Kato locos draw less than .2 amps slipping, so at first that did not make sense.  But, then I got to thinking that my Katos have all seen quite a bit service over the years and have accumulated their fair share of gunk which likely has decreased their efficiency and increased their current draw.  Add to this the fact that I have a number of tunrouts connected to track power, there are 30 or so idle locos on the layout and there were 6 throttles plugged into the loconet and I think maybe we were straining the power limits of the system.  I have been able to recreate the problem, by running 7-8 mutliple consists at the same time.  When I recreated the problem, I discounected the PM4s and found out that, when it shuts down, the system makes continuous clicks which the manual says mean a drop in voltage.
   So, I have concluded that either I need to add a second 5 amp booster or my power supply is not providing enough volts.  Since I am using the Digitrtax 15 volt, 5 amp power supply, I doubt its the problem.  I'm leaning more toward not enough power.  I'm going to see if I can get a spare booster here so that I can test and see if that is indeed the issue.  If so, I will be in the market for an additional booster for the layout. 
   I'd be interested if anyone else out there has any ideas on what the problem might be.  I always try to keep an open mind about such things.

Wednesday, October 20, 2010

Signalling in Fulton, IL

I installed a set of signals at MP 133 on the east end of Fulton, IL.  This location is much closer to the edge of the layout than the first set of signals I installed from Scale Models Division.  This makes them so much easier to appreciate.  I am really liking these signals.   The fine scale profile of the ladders and platforms are outstading as are the scale size of the box behind the target containing the LED.  The LED light itself is a bit bigger than I like, so I have been using a fine point sharpie marker aroung the edge of the opening to reduce the size of the light.  I am finding that the size/brightness of the light on N scale signals is a balancing act.  They need to be smaller and dimmer to look prototypical.  However, they need to be bigger and brighter so that human operators can see the color indications.  The actual colors are another thing.  I can see the difference between red and yellow on the signals, but I am finding that some operators are not able to distinguish very well between red and yellow.   There was a suggestion at our last operating session that I use flashing red or flashing yellow so that operators can more easily see the change in signal indication.  That would work fine, but it would not be prototypical for the Union Pacific Geneva Subdivision.  Again its a balancing act.  Right now I am leaaning toward doing red - flashing yellow - green for operating sessions and red - flashing yellow - yellow - green when I am operating solo.  

   Anyway, the Scale Models Division signals are awesome and highly recommended.  This week I will be installing a couple of bridge signals and I will hopefully post some pictures the weekend.


Friday, October 15, 2010

Basic Scenery for Fulton

Basic scenery has now found its way to Fulton, IL.  That leaves just the Mississippi River, Clinton, and Proviso areas without basic scenery.  The plan is to continue through to these remaining areas abd theb shift gears to working on rolling stock.  However, I may toy around with some static grass in a few areas along the way.  Rolling stock work that need to be done includes weathering, proper weighting, resister wheelsets and body mounted couplers. 

This first view is looking east.


Looking west

Overall view

Tuesday, October 5, 2010

Trees added to Franklin Grove

Trees really add realism to a layout. The scences below still do not have roads, ballast, static grass or details, but still looks pretty good just with the addition of trees. Adding trees is much easier this time around since I saved all the trees from the old layout. I am hoping to get to Rockford this weekend to get some static grass and get it applied somnetime soon in this area.

Daryl