Sunday, August 14, 2011

Bridge Piers

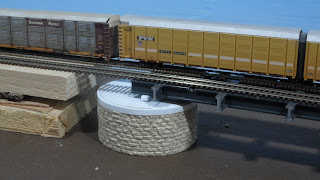
To construct bridge piers for the Mississippi River crossing I used Chooch Industries # 9832 N scale double concrete bridge piers and their #8260 flexible and easy to cut stone walls with peel and stick backing.  It was super simple to cut the flexible stone walls, peel the backing and stick the wall around the concrete piers.  Its great also how close the resulting piers come to represent the prototype piers.  For the large round pier in the middle of the rotating bridge, I had to construct a round base out of styrene to the correct dimensions and then cut the stone wall, peel and stick the wall to the base.  I think I may have made the round pier just a bit to tall, so I may end up removing the bottom row of stones to shorten it a little.   I still need to paint and weather the piers, but so far they look great! You can also see that I have the floor for one half of the rotating bridge in place.  The second half will go in once I get some more Plastruct I beams. 


Saturday, August 13, 2011

Construction begins on Rotaing Bridge

Work has begun on the Mississippi River rotating bridge. I began with construction of the bridge floor. I first tried to construct the floor with the cross I-beams intersecting with the lengthwise I-beams in much the same way the Walther's double track Warren truss bridge kit. That turned out to be a failure as I was not able to cut the I-beams precise enough for them to fit together properly. So instead, I lined up the pairs of lengthwise 3/8" I-beams by gluing a 5/16" I-beam between them. I then cut 3/8" I-beams into 9/16" long sections and glued them in between the pairs of I-beams at 1.75" intervals. Last, I cut 3/8" I-beams into 3/8" lengths and glued them to the outside of the I-beams pairs and lined up with the I-beams on the inside. Dimensions for the floor were determined by using a scaled printout of a picture taken of the actual bridge. The completed floor is just one half of the bridge. After ordering some more 3/8" I-beams, I will assemble the other half and then begin work on the upper structure of the bridge.


Sunday, August 7, 2011

Mississippi River Bridges - pics and video

After painting and installing the camel back bridge, I decided to take some video and shoot a couple of pictures.  As you can see, I still need to do the piers and, of course, the main rotating bridges. But, I'm pretty happy with the progress so far.


Truss Braces in Place for Camel Back Bridge

Cross braces have been installed. The trusses in the new configuration are ready for assembly as per kit instructions. 

Saturday, August 6, 2011

Camel Back Bridge

With the Whipple bridge complete, I started work on the camel back bridge.  I am again using the Walther's double track warren truss bridge kit as the starting point for this project.  The prototype is shown in the photos below.


First step was to cut out the inside truss braces.  I made sure to leave the gussets intact.  After the braces were removed, I then cut the truss beams into three top pieces and two side pieces.  Using a prototype picture I printed out, scaled to the correct size, I glued the pieces back together in a camel back configuration similar to the prototype.  I needed to file the ends of the beams to new angles to get them to fit properly in the new configuration.   The photo below shows one truss cut up and one glued back together in the camel back configuration.  Next I will cut new braces for the truss and glue them in place.  I will be using I-beams from Plastruct for the braces.  Stay tuned.